Discover the art of “drawing:x_jcvq0yuaw= tiger” through step-by-step instructions, tips, and techniques. Learn how to capture the beauty and essence of a tiger in your artwork.
Introduction
When it comes to wildlife, few animals are as captivating and awe-inspiring as the tiger. Their majestic beauty, strength, and intricate patterns make them an excellent subject for any artist, whether you’re a beginner or an experienced professional. In this blog post, we delve into the exciting world of “drawing:x_jcvq0yuaw= tiger” and explore how you can bring this magnificent animal to life on your canvas or sketchpad. Throughout this journey, we’ll discuss the significance of capturing the tiger’s essence and how its features can be realistically portrayed with attention to detail. From understanding its anatomy to mastering shading techniques, this comprehensive guide will cover everything you need to know to succeed in your tiger drawing.
Why Draw a Tiger? The Symbolism Behind the Tiger
Tigers symbolize strength, courage, and beauty. Their powerful presence in both nature and mythology has made them a favorite subject for artists across cultures and time periods. Drawing a tiger isn’t just about sketching an animal; it’s about capturing the spirit and essence of these magnificent creatures. Artists who choose to draw a tiger often do so because of the challenge it offers. The animal’s complex fur patterns, fierce expression, and elegant posture demand a deep understanding of its form. However, beyond their intimidating appearance, tigers are also symbols of freedom and mystery, which make them fascinating subjects for artistic expression.
Materials You Will Need for “drawing:x_jcvq0yuaw= tiger”
Before you begin drawing your tiger, it’s essential to gather the necessary materials. Whether you plan to sketch with pencils, charcoal, or colored pencils, the right tools will ensure that you capture every detail with precision. Here’s a list of materials you’ll need for a successful “drawing:x_jcvq0yuaw= tiger” creation:
- Pencils: A variety of pencils, ranging from 2H to 8B, will give you the flexibility needed for fine details and shading.
- Paper: Use high-quality drawing paper with a smooth texture to ensure that your lines are sharp and clear.
- Erasers: A kneaded eraser is perfect for highlighting areas and refining your details.
- Blending Stumps: These are essential for smoothing out your shading and creating a realistic look.
- Colored Pencils or Pastels (optional): If you want to add color to your tiger drawing, these materials will help you achieve vibrant and realistic fur tones.
Once you’ve gathered your materials, you’ll be ready to start your artistic journey. Having the right tools will allow you to fully express the magnificence of the tiger in your artwork.
Understanding the Tiger’s Anatomy
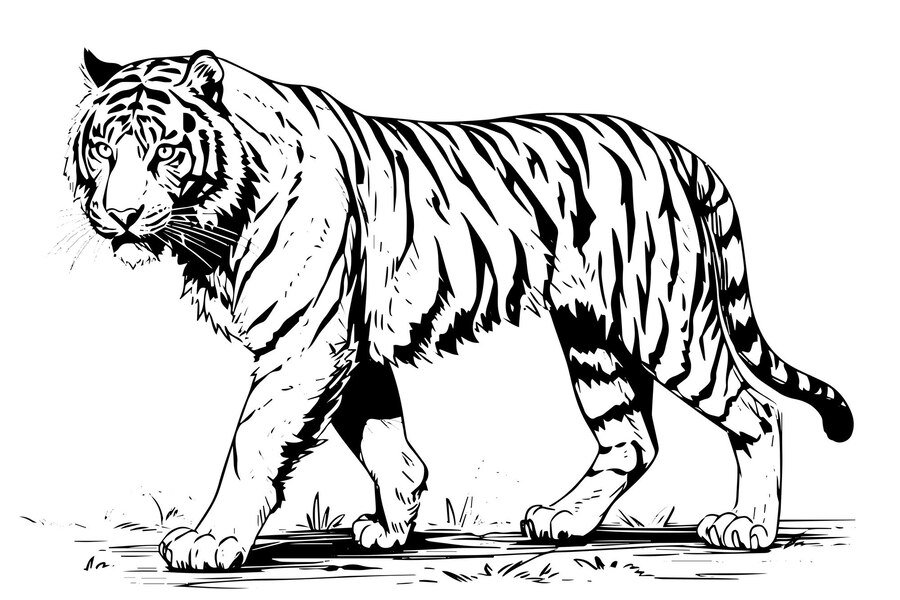
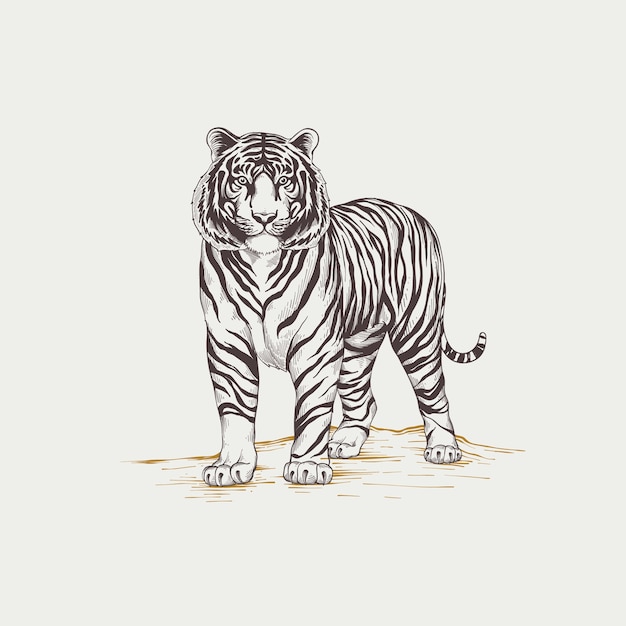
To truly master “drawing:x_jcvq0yuaw= tiger,” understanding the anatomy of this incredible creature is crucial. The tiger’s body is built for speed, strength, and agility, and every part of its structure contributes to its overall design. Start by familiarizing yourself with the tiger’s key anatomical features. These include its muscular build, long tail, large paws, and powerful jaws. Additionally, understanding the tiger’s proportions will help you draw it with accuracy, whether you’re illustrating it in motion or at rest.
The tiger’s head, with its sharp eyes, strong jawline, and rounded ears, plays a vital role in expressing its personality. Its long, muscular tail is not only a crucial balancing tool but also an important feature to capture in your drawing. When sketching the tiger’s body, focus on the subtle curves of its muscles, especially the powerful legs that enable the tiger to pounce with great force. The tiger’s fur pattern, with its distinctive stripes, adds complexity to the drawing, but understanding the shape and placement of these patterns can help you achieve a realistic effect.
Sketching the Basic Outline of the Tiger
Now that you’ve studied the tiger’s anatomy, it’s time to begin the drawing process. Start with a basic outline to establish the overall shape and proportions of the tiger’s body. Don’t worry about getting everything perfect at first; the goal is to create a framework that you can refine later. Begin by lightly sketching an oval shape for the head and a long, curved line for the body. Add guidelines to mark the tiger’s posture and direction. The key is to focus on basic shapes before adding intricate details.
Remember to use light, gentle strokes at this stage so you can easily erase and adjust the outline if necessary. Pay attention to the tiger’s posture – is it sitting, standing, or in motion? Once you’ve established the basic form, start adding the legs and tail, keeping the proportions in mind. Don’t forget to sketch the tiger’s face in relation to the rest of the body. This outline will serve as the foundation for all the details that will follow.
Detailing the Face of the Tiger
The tiger’s face is one of its most expressive features, and capturing its intensity requires careful attention to detail. Begin by defining the eyes, nose, and mouth. The eyes should be large and almond-shaped, with a piercing gaze that reflects the tiger’s powerful nature. Focus on the placement and shape of the nostrils, as they play an important role in giving the face depth. The mouth should be slightly open, revealing sharp teeth if you’re aiming for a more fierce expression.
Once the facial features are in place, start adding the details around the eyes. The tiger’s eyebrows are distinct, and the fur around the face is often thicker, creating a shadowed effect that enhances its fierce look. Add fine lines to define the jaw and muzzle area. The whiskers also contribute to the tiger’s expressive face, so be sure to sketch them with subtle, curved lines.
Shading Techniques for the Tiger’s Fur
Shading is one of the most critical aspects of “drawing:x_jcvq0yuaw= tiger,” as it gives depth and dimension to the animal’s fur. Start by lightly shading the areas that are naturally darker, such as the sides of the face, under the chin, and along the back. Use a softer pencil, such as a 6B or 8B, to create darker tones. When shading, focus on the direction of the fur, following its natural flow and texture. The tiger’s fur is often short and dense, especially around the head and neck.
Use a blending stump to smooth out the shading and create a realistic fur texture. Remember to build up layers gradually, allowing for subtle transitions between light and dark areas. As you work, keep in mind that the tiger’s fur is not just a solid color; it has different tones, so be sure to include light highlights and darker shadows to add realism. The more time you spend on shading, the more lifelike your drawing will appear.
Creating the Stripes of the Tiger
The tiger’s distinctive stripes are one of its most iconic features, but they can be challenging to draw. Begin by lightly sketching the outline of the stripes on the tiger’s body. Take note that the stripes are not perfectly symmetrical – they vary in thickness and shape across the animal’s body. Focus on capturing the natural flow of the stripes along the back, legs, and face. Don’t make the stripes too rigid; instead, let them curve and bend along the contours of the tiger’s body.
When adding shading to the stripes, use a darker pencil or charcoal to create contrast between the dark stripes and the lighter areas of the fur. The key is to keep the stripes subtle but distinct, adding enough definition to make them stand out without overpowering the rest of the drawing. As you continue to refine the stripes, be sure to vary their lengths and widths to give the tiger a natural, wild appearance.
Drawing the Tiger’s Powerful Limbs and Tail
A tiger’s limbs are muscular and powerful, designed for running, leaping, and hunting. When drawing the legs, focus on the structure of the muscles, which are more prominent near the shoulders and thighs. The paws are large and padded, providing the tiger with a firm grip while it moves through its habitat. Pay attention to the way the paws are angled, whether the tiger is standing, running, or crouching. The claws are often visible when the tiger is in a defensive stance, so consider adding subtle details around the paws for added realism.
The tail is another crucial feature that requires attention. The tiger’s tail helps maintain its balance, especially during high-speed chases. When drawing the tail, remember that it’s long and flexible, often curving in response to the tiger’s movements. Whether it’s swaying gently or poised in an alert position, make sure the tail’s positioning reflects the tiger’s overall posture.
Adding Depth with Layers and Textures
As you refine your tiger drawing, the next step is to add depth with layers and textures. This technique is especially important for the fur and skin, as it will give your drawing a more lifelike appearance. Use soft, layered pencil strokes to build up the texture of the fur. Pay close attention to the direction of the strokes, as they should follow the natural flow of the fur. In areas where the fur is denser, such as the underbelly or around the neck, add more layers to create a thicker, more textured effect.
To create depth, you’ll also want to pay attention to the light and shadow in your drawing. Darken areas that are farthest from the light source, such as the undersides of the limbs and the tiger’s back. Lighter areas, such as the face and top of the head, should have less shading, allowing the light to naturally highlight these features. The combination of layering, texturing, and shading will bring your tiger drawing to life, giving it the depth and realism that’s characteristic of this magnificent creature.
Refining and Enhancing Your Drawing
Once you’ve completed the majority of your tiger drawing, it’s time to refine the details and make any necessary adjustments. Take a step back and assess your work from a distance to ensure that the proportions, shading, and overall composition are accurate. Use an eraser to highlight areas that need to stand out, such as the tiger’s eyes, teeth, and claws. Adding these final touches will help enhance the focal points of your drawing and make the image appear more dynamic.
If you’ve been using colored pencils or pastels, you can now add finishing touches to the fur to give it a polished, vibrant look. Be sure to blend the colors seamlessly to avoid harsh lines. Take time to add subtle highlights to areas where the light hits the fur, such as the tips of the ears or along the tiger’s back. By carefully refining every detail, you’ll create a drawing that not only captures the tiger’s physical form but also its incredible presence.

Conclusion
Drawing a tiger is a rewarding challenge for any artist. The process involves careful attention to detail, from understanding its anatomy to mastering shading and capturing the essence of its stripes. With patience, practice, and dedication, you can create a stunning portrayal of this magnificent animal. Whether you’re working on a realistic or stylized version, remember that every tiger drawing is a unique masterpiece that showcases your artistic growth. As you continue to explore and refine your skills, don’t forget to celebrate your progress and keep pushing the boundaries of your creativity. Happy drawing!